This guide describes the features of the Prysm integration in Unity3D. A basic understanding of the Unity3D engine, as well as HTML/JavaScript is assumed.
Brief overview of Prysm
Prysm is a modern user interface middleware solution that allows you to integrate HTML pages built with CSS and JavaScript in your game. The communication between your game and the HTML engine is done through the CohtmlUISystem component. Each HTML page is called a View. The View component allows you to perform operations on the page, such as resizing, navigating to a different URL, sending input events and so on.
Installation
Prysm for Unity3D is distributed as either:
- A unitypackage file
- An archive for the Unity3D package manager
Using a .unitypackage file
If you prefer using a unitypackage you can import it in your project by either double-clicking on it, or by importing it through the Unity3D Project window.
First, open your project in Unity3D Editor, then:
- From the menu bar choose Assets -> Import package -> Custom package.
- Navigate in the file chooser dialog to the folder with your Prysm package.
- Click Open and a Unity3D dialog with all files of the package files listed should open.
- Click Import.
Using the Unity3D Package Manager
If you prefer using the Unity3D Package Manager you can import the archive in your project by following these steps:
First, open your project in Unity3D Editor, then:
- Extract the Prysm archive in your preferred location.
- From the menu bar choose Window -> Package Manager -> Plus sign -> Add package from disk...
- Use the file chooser dialog to navigate to the folder you extracted the archive in.
- Double click on the package.json file, located in the extracted Prysm archive.
- The Unity3D importing process should start automatically
Package import process
- Note
- Alternatively, you can extract the Prysm archive in you ProjectName/Packages folder and open the editor. Unity3D will detect and import the package automatically.
Trial versus Pro versions
The trial version includes a 30 day trial license key. After the key expires you won't be able to initialize Prysm and an error message will be logged in the console.
The pro version requires entering your license key first. The license key is located at Standard Assets/Cohtml/Detail/License.cs. You should've received this file already prefilled with your license key when you bought the pro version. Replacing the existing empty License.cs file from the package with the provided one will activate Prysm.
- Note
- The trial and pro packages contain different libraries. When upgrading to pro from trial, you should reimport the pro package and replace the libraries.
Package contents and structure
The package has the following structure:
Unitypackage
The root folder of your package should be located in the Assets folder of your project.
- Gizmos/Cohtml - icons only for Unity Editor integration.
- Cohtml - contains samples and documentation.
- Plugins - contains the Cohtml libraries. These are automatically copied when building.
- Standard Assets/Cohtml - contains the Prysm integration classes. You'll find a Detail folder inside which contains classes that are internal for the implementation and are used by the "public" classes. The interface you should be using is outside the Detail folder:
- CohtmlView.cs - component used for displaying html pages.
- CohtmlUISystem.cs- component used to initialize and manage the UI.
- StreamingAssets/Cohtml/UIResources - contains the UI resources for Prysm.
- These are automatically copied when building.
- You can also load resources from your custom locations
- Note
- If you want to uninstall the package you should remove the folders listed above. Exception is the Plugins folder when you have other plugins there.
Package manager
The root folder of your package should be located in the Packages/Cohtml folder of your project.
- Editor - contains the editor scripts for Prysm. It will be ignored when building.
- Plugins - contains the Cohtml libraries. These are automatically copied when building.
- Runtime - contains the Prysm integration classes. You'll find a Detail folder inside which contains classes that are internal for the implementation and are used by the "public" classes. The interface you should be using is in the Components folder:
- CohtmlView.cs - component used for displaying html pages.
- CohtmlUISystem.cs- component used to initialize and manage the UI.
- StreamingAssets/Cohtml/UIResources - contains the UI resources for Prysm.
- These are automatically copied when building.
- You can also load resources from your custom locations
- Note
- If you want to uninstall the package you can do it from Window -> Package manager -> Cohtml -> Uninstall or delete it manually from the
Package folder.
Samples
Prysm comes with several predefined example scenes, showcasing some of the features and capabilities of the product. In order to preview them, you need to install them manually, as shown below.
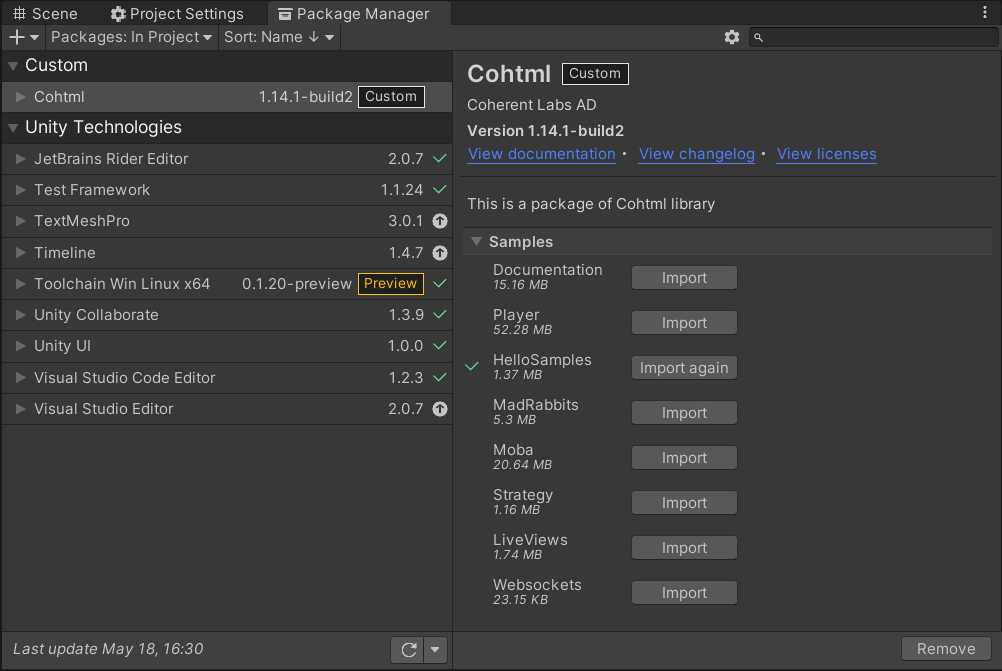
Cohtml samples
- Open the Package Manager menu and select the Prysm package. On the right panel click
Import
- Navigate to
Assets/Samples/Cohtml/[Version]/[SampleFolder]/[SampleName].unity. This step will import the UI resources for the CohtmlView automatically inside the Assets/StreamingAssets/Cohtml/UIResources/[SampleScene] folder and will import the scene inside build settings.
- You can use the HelloSample to browse all scenes provided by Prysm. Start the game from that scene
- If you want to delete the Prysm example scenes navigate to
ContextMenu -> Gameface -> Remove samples. That action will remove the samples:
- From
Assets/Samples
- From
Assets/StreamingAssets/Cohtml/UIResources
- From Build settings
Additional packages for import
Documentation button will import Prysm offline documentation.Player button will import Prysm native player.
- Note
- Remove samples will not remove any additional resources from
Assets/StreamingAssets/Cohtml/UIResources, other than the ones used in the samples.
Add Prysm view to your scene
In Prysm there are two types of views - Screen and World views, the first is used for HUDs and menus, while the latter can be used for in-game UI (interactions between the player and the game). Let's start by creating and displaying a simple HTML page - call it HelloHTML.html
Create an HTML file and place it in the UIResources folder (By default, this is the Assets/Streaming Assets/Cohtml folder.). The page will be displayed instead of a HUD, so click on the MainCamera (it will be the GameObject on which the html will be attached), open Prysm (in the main menu) and choose Add Screen View. Go to the Page property of the view and set the relative URL of the HelloHTML page here, for example: coui://uiresources/HelloHTML.html. Click Play and you'll see the result.
- Warning
- If you have a space in the name of your project, this could forestall the HTML from loading.
